Installing a Jet Kit
EX500 and 250
Installation of a Factory Config 10 Jet kit
Click on pictures to see larger ones. Be aware, the larger pictures may be up to300k. They are VERY high quality pictures. This is necessary to make all the parts visible. More pictures will be added but I need to have them scanned first. Also, the step-by-step for the float height adjustment isn't online yet. (I haven't done it yet!) I hope this helps.
|
Parts needed:
Tools needed:
|
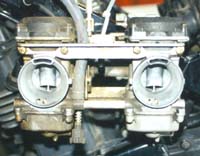
Beautiful picture of the carbs, once removed from the rubber seats. They may be dirty, but...you know how that is |
|
Preparation:
|
|
Installation: Now you're ready to begin the installation. From here, I will go as I went in my installation, recommending the settings that seem to be the most common among other riders. Keep in mind that you WILL most likely have to redo something in the setup to make the bike run correctly. The settings here are only a starting point.
|
This is a good view of the assembly. Make sure to keep it all in order |
|
This view doesn't show the "2 clip method" but you get the idea, right? |
Now, make sure you keep the pieces in order for replacement. Take the new needle from the jet kit and place 1 e-clip on the 3rd slot from top, and 1 e-clip on the 1st slot from top. The clip in 3rd position is there to determine needle height and the clip on 1st position is there to keep needle from bouncing. (note: this method was suggested to me by the guys at the Factory Pro website. It's not the method intended, notice the shim washers that are now useless, but it works better.) |

| When changing settings here, ALWAYS remember that clip positions are counted from the TOP of the needle. Once both needles have been changed, put the diaphragm/spring/needle assembly in the carbs and CAREFULLY replace the black caps on top with the new allen head bolts. Be very careful not to pinch the diaphragm under the cap. If this happens, you will most likely foul a spark plug and the symptoms (sluggish, very quiet, very sputtery, gas leaking out of muffler) are very scary if you don't know what it is. |
| Turn the carbs over
and remove the fuel bowl caps with the four screws on each carb.
Here you will see a plastic "float" in each carb.
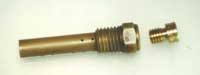
In the middle of the bowl, there is a screw with a flat head
slot in it.
These are the main jets. Remove each screw (one per carb, if you get confused which screw it is, just remove both and see which looks like the new screw) and replace with the 132 (on the ex500, for example) main jet screws from the jet kit. Again, this is a suggested setting. The 132 is one step above the stock 130's and provides better top-end performance. You may find that you need the 135's. This is common.
|
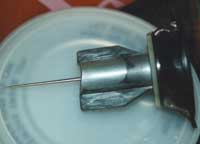
This is how the main jet will look. You replace the SMALLER jet shown |
| Now, notice the
metal tangs that stop the float from moving in one direction.
I will come back to this later, after you've tested and tried
tuning your bike. If it is consistently sluggish under 3k rpm,
then you MIGHT need to adjust your float height.
This isn't easy and requires exact measurements. If you have determined that you must do this, go HERE.
|
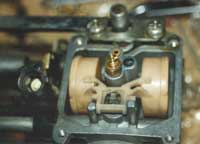
This is a beautiful view of all the workings in the float bowl. In the center, you see the main jet and you can also see the tangs that stop the floats.
|
| Replace the caps on the fuel bowls. Now you will drill the small caps out of the Idle-mixture screw holes. Look under the carbs, there is a post extending from the bottom of each carb, on the side. The tube has an aluminum cap inside. Under this cap is the idle-mixture setting screw. You need to drill the cap out. Take a small drill bit, around 1/16" or 1/8" and drill barely through the cap. Be sure not to go too far or you may damage the screw. Then, if the cap doesn't pop out from the torque, take a small piece of metal and pry the cap out. It's very easy. |
| The idle-mixture screws are for adjusting the low-rpm gas flow. For more information on how this should be set, go to the Factory Pro CV Carb tuning tips page. For now, turn the screws to 2 or 2.25 turns out. Make sure that you turn the screws full in first. |
| Exhaust Air Injection
Block-off Procedure
OK, put the carbs
back in the bike. |
Finally, you're finished with the easy stuff. The hard stuff is tuning the system. Replace everything on bike. You will have to ride the bike to see which areas need changing. Once again, refer to the Factory Pro Carb tuning tips page for necessary changes.
Many thanks to Mike ( romad28@geocities.com ) for all the EXCELLENT pictures on this page. I definitely couldn't have explained things without them. Thanks.
| If you see anything wrong with my installation procedure, PLEASE email your suggestions or corrections. The last thing I want to do is make the installation of a jet kit HARDER than it already is for beginners. I appreciate any and all suggestions to these pages. |
Thanks to Rocky Cherry for the install routines. Be sure to visit his E500 site. Click here!
Factory Tuning Components
1 (415) 883-5620